Custom Fields Overview
Overview #
Custom fields store business-specific information beyond standard fields (email, name, phone). Tailor PloverCRM to your unique data needs.
Examples: Company Name, Industry, Budget, Renewal Date, Property Type, Loyalty Tier

Storage #
Custom fields are stored securely in your WordPress database and can be accessed through the PloverCRM interface or integrated with FluentCRM.
Field Types #
- Text: Short text (Company Name, Job Title) – 255 chars
- Textarea: Long text (Bio, Address) – unlimited
- Number: Numeric values (Age, Budget, Score)
- Email: Additional emails with validation
- URL: Website links with validation
- Date: Dates without time (Y-m-d format)
- DateTime: Dates with time (Y-m-d H:i:s format)
- Select: Single choice dropdown (Industry, Status)
- Multi-Select: Multiple choices (Interests, Services)
- Checkbox: Yes/No or multiple selections
- Radio: Single choice, always visible (Gender, Contact Method)

Creating Custom Fields #
PloverCRM Settings:
- PloverCRM → Settings → PloverCRM tab
- Custom Fields → Add Custom Field
- Configure:
- Label: Display name (e.g., “Company Name”)
- Slug: Auto-generated identifier (e.g., “company_name”)
- Type: Choose field type
- Group: Optional grouping (e.g., “Company Info”)
- Options: For select/multi-select (one per line)
- Help Text: Optional description
- Read-only: Check if shouldn’t be edited
- Save Field
FluentCRM: FluentCRM → Settings → Custom Fields → Add New Field

Managing Custom Fields #
Edit: Settings → Find field → Edit → Update → Save
⚠️ Warning: Changing field type may cause data loss. Export first!
Delete: Settings → Find field → Delete → Confirm
⚠️ Warning: Deletes all data for all contacts. Cannot be undone!
Reorder: Drag and drop fields (affects display order)
Using Custom Fields #
Setting Values
Create or Update Contact:
- Open contact edit screen
- Find your custom fields section
- Enter values for each field
- Save Contact
Permissions #
Control who can create, read, and update custom fields per role.
Configuration:
- PloverCRM → Settings → Role Manager
- Edit role → Custom Field Permissions
- Set per field: ☐ Create, ☐ Read, ☐ Update
- Save Role
Form Integration #
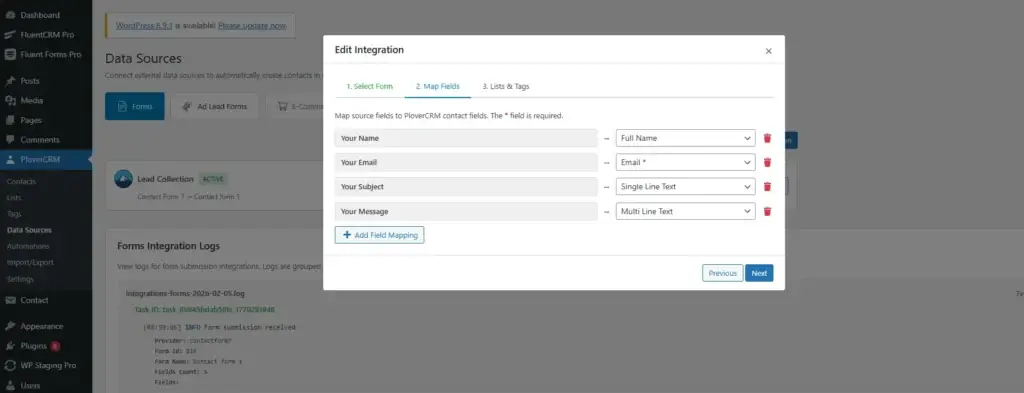
Map form fields to custom fields in Data Sources:
- PloverCRM → Data Sources → Create/edit integration
- Field Mapping: Form Field “Company” → CRM Field “company_name”
- Save → Form submissions auto-populate custom fields
Mobile App Support #
Full support: view, edit, filter, search all field types with offline sync.
Includes date/time pickers, dropdowns, and native controls.
Validation #
Built-in Validation:
- Email: Valid format required
- URL: Valid format required
- Number: Numeric only
- Date: Valid date required
Best Practices #
Naming
✅ Clear labels: “Company Name” not “Company”
✅ Consistent naming: Use lowercase with underscores for identifiers
✅ Avoid abbreviations unless industry-standard
Organization
✅ Use groups (3-5 max) with clear names
✅ Logical order: important fields first, related fields together
✅ Don’t overdo it: only create fields you’ll use
Data Quality
✅ Use select fields for consistency (vs free text)
✅ Set sensible defaults
✅ Make required sparingly (reduces form abandonment)
Common Setups #
B2B Sales
- Company Info: Name, Size (select), Industry (select), Revenue (number)
- Deal Info: Value (number), Stage (select), Close Date (date), Decision Maker (text)
- Preferences: Contact Method (select), Best Time (select), Newsletter (checkbox)
E-commerce
- Customer: Type (B2B/B2C), Lifetime Value (number), Total Orders (number)
- Preferences: Categories (multi-select), Loyalty Tier (select)
- Shipping: Address (textarea), Preferences (select)
Real Estate
- Property: Type (select), Budget Min/Max (number), Location (text), Bedrooms (number)
- Status: Pre-approved (checkbox), Amount (number), Move-in Date (date)
Troubleshooting #
Field not showing: Refresh/clear cache, check group, verify saved, check permissions
Can’t edit: Check read-only setting, verify role permissions, confirm update access
Data not saving: Verify field type matches data, check validation, check permissions
Deleted by mistake: Recreate field with same identifier (data may persist), restore from backup


