Skip to content
PloverCRM logo PloverCRM
  • Home
  • Pricing
  • Documentation
  • Changelog
  • Account
Get PloverCRM Sign in
Sign in Get PloverCRM

Getting Started

9

Mobile App

50

Automations

7

Leads & Pipeline

30

Integrations & Data

15

Settings & Customization

18
  • Account & Profile
    • Change or Recover Your Web Account Password
    • Update Your Profile in the Web Dashboard
  • Lead Fields & Display
    • Manage Display and Appearance
    • Configure Lead Table Columns
    • Configure Lead Actions and Activity Logging
    • Manage Custom Fields
    • Review System Managed Fields
    • Manage Lists
    • Manage Tags
  • Messaging & Notifications
    • Configure Browser Notifications
    • Customize New Lead and Reminder Alerts
    • Configure Email Reply Settings
    • Create and Manage Message Templates in the Web Dashboard
  • Business & System Settings
    • Review Settings, Feature Logs, and Support
    • Understand the Settings Overview
    • Review System Health
    • Refresh Workspace Data in the Web Dashboard
    • Update Business Information in the Web Dashboard

Team & Workspaces

11

Help & Troubleshooting

18
View Categories
  • Home
  • Docs
  • Settings & Customization
  • Lead Fields & Display

Manage Lists

2 min read

0:00 / 2:04
  • View as Markdown Open this page as plain Markdown (opens in a new tab)
  • Open in ChatGPT Ask questions about this page (opens in a new tab)
  • Open in Claude Ask questions about this page (opens in a new tab)
  • Open in Google AI Studio Ask questions about this page (Google account required) (opens in a new tab)

This guide explains how to use manage lists while keeping the selected workspace, record, and result in view.

The names of buttons and sections can vary with your PloverCRM plan, permissions, connected services, and current version. When a label differs, use the matching label displayed in your account and do not change an unrelated setting.
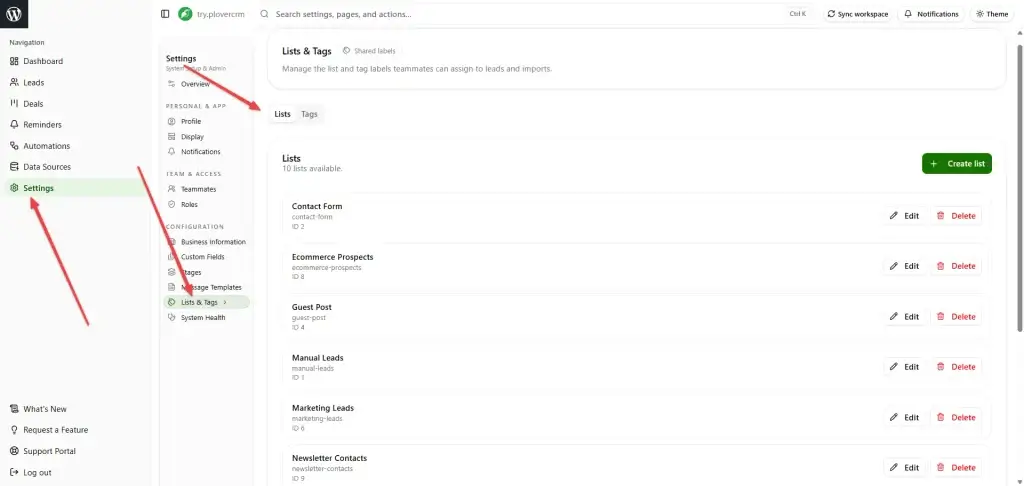
screenshot try.plovercrm.com 20261031 171047 - Plover CRM

Before you begin #

  • Sign in to the PloverCRM Web Dashboard.
  • Select the workspace or connected website where you intend to work.
  • Confirm that your role allows the screen and action described here.
  • Prepare approved or fictional test data when the workflow changes records, sends messages, imports data, or triggers an automation.
  • Finish or cancel unsaved edits before switching workspaces, refreshing, or leaving the page.

Steps #

  1. Sign in to the PloverCRM Web Dashboard and select the intended workspace.
  2. Open the Custom Fields, Lists, and Tags area from the left navigation.
  3. Locate the screen or control for Manage Lists.
  4. Review the current information before making a change.
  5. Enter or select the required values using the labels shown in your account.
  6. Review validation messages, access restrictions, and the effect on related records.
  7. Choose Save, Apply, Continue, or the matching control.
  8. Wait for confirmation and review the updated result.

What to verify #

After the final step, confirm:

  • The workspace name and connected website still match the intended destination.
  • The status, record, filter, setting, or result reflects the change you made.
  • No unrelated lead, teammate, connection, message, or automation was changed.
  • Any export, notification, file, or external action follows your organization’s privacy and retention policy.

PloverCRM should display a confirmation, updated status, or refreshed record. If the workflow is asynchronous, use its progress or log view instead of submitting the same request again.

Troubleshooting #

  • If the screen or control is missing, confirm the workspace and ask an administrator to review your role.
  • If results are empty or stale, clear filters, refresh once, and check workspace connection status.
  • If a value is rejected, read the field-level message and use the required format.
  • If an operation is processing, wait for its status or log entry before trying again.
  • If the result is unexpected, stop before making another change and record the exact non-sensitive message, approximate time, browser, and reproduction steps.

Updated on November 3, 2026
Lead Lists Lead Management Lead Segmentation Web

What are your Feelings

  • Happy
  • Normal
  • Sad

Share This Article :

  • Facebook
  • X
  • LinkedIn
  • Pinterest
Review System Managed FieldsManage Tags
Table of Contents
  • Before you begin
  • Steps
  • What to verify
  • Troubleshooting
PloverCRM

Plover CRM helps businesses manage leads, automate workflows, and strengthen customer relationships.

Get it on Google Play Download on the App Store

Quick Links

  • Documentation
  • Multi-Workspace Web App
  • Data Deletion Policy
  • Changelog
  • News and Articles
  • Terms of Service
  • Privacy Policy

Contact Support

Request FeaturePublic Roadmap Open TicketSupport Portal

Copyright © 2026 WebPlover - Developed by WebPlover